Setting Up SFML.NET 2.0 to Work With Visual Studio 2012 C# Projects
May 12, 2013(For those of you unfamiliar, SFML is one of the best alternative libraries to SDL and provides high-level access to graphics, sound, input and networking. It’s perfect for 2D games and other multimedia applications. You can check it out over at their website)
Special thanks to LA and Tyson for pointing out some details in the comments! 🙂
So SFML 2.0 recently went out of RC and is now the official stable version. As I found out about the news I decided to try it out, and since I just installed Visual Studio 2012 I also wanted to see if SFML would work on such an IDE. I saw that the SFML library also had updated bindings for the .NET languages (Visual C++/Basic, C#, etc.) and wanted to take my hand at getting SFML to work with it. It was a bit of a hassle since the tutorials at the main website only listed instructions for getting SFML to work with C++ projects, so I had to do some fuddling around to get it to work with a C# project (it should, since it’s a .NET binding for the library)
Anyway, for those of you still having trouble adding SFML to your C# projects in Visual Studio 2012, here are the steps to get you up and running (before anything else, make sure to download the SFML.Net binaries here (make sure to download the right version for your project, as there are both 32 and 64-bit versions), and extract them somewhere on your drive–it doesn’t matter where.):
- Create a new C# project in Visual Studio 2012. It can either be a Console or Windows Forms project– the difference is that a Console project displays a console when you run the application. If you create a new Windows Forms project, you can safely remove the pre-generated Form1 item in the project.
- Right-click your project in the Solution Explorer and click on ‘Add Reference…’
- When the Reference Manager window appears, browse to the folder where you extracted the SFML.net archive and go to the ‘bin’ ‘lib’ folder. Select the .dll files in the ‘lib’ folder and Click on ‘OK’ in the Reference Manager window to add them to your project.
- Once the .dll files appear in the References section of your project, right-click your project again and click on ‘Add’ > ‘Existing Item…’ Navigate to the ‘extlibs’ folder this time and add the .dll files there (you may have to select .dll files as file filter in the Open dialog box).
- Once these .dll files appear on your Solution Explorer, right-click on them and select ‘Properties’ (or press Alt-Enter). In the Copy to Output Directory property, set it to ‘Copy if newer’.
- That’s it! SFML.net is now set-up for your project.
To test if SFML.net has been fully set up for your project, you can try to run this code snippet (add it to your project’s main file):
using System;
using System.Collections.Generic;
using System.Linq;
using System.Threading.Tasks;
using System.Windows.Forms;

using SFML;
using SFML.Graphics;
using SFML.Window;

namespace SFML_Test {
   static class Program {

   static void OnClose(object sender, EventArgs e) {
      // Close the window when OnClose event is received
      RenderWindow window = (RenderWindow)sender;
      window.Close();
   }

   static void Main() {
      // Create the main window
      RenderWindow app = new RenderWindow(new VideoMode(800, 600), "SFML Works!");
      app.Closed += new EventHandler(OnClose);

      Color windowColor = new Color(0, 192, 255);

      // Start the game loop
      while (app.IsOpen()) {
         // Process events
         app.DispatchEvents();

         // Clear screen
         app.Clear(windowColor);

         // Update the window
         app.Display();
      } //End game loop
    } //End Main()
  } //End Program
}
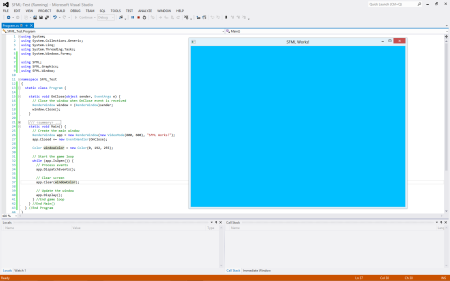
When you run your project the output should be similar to this (see screenshot):
For those of you who still need help, feel free to ask in the comments! 🙂

There isn’t a “bin” folder.
Woops! You’re right, it should be the ‘lib’ folder. Corrected the instructions in the blog post.
Apologies for any confusion and thanks for pointing it out! 🙂
Best instructions for the best binding of the best multimedia library.
Thanks for being awesome!
Indeed. Great library meets great programming language. Thanks for reading! 🙂
Really helpfull, thanks!
No problem. Glad to help! 🙂
Thanks for this! It is strange that the SFML folks decided against including instructions for the most popular .NET language (C# by a mile) when they made their .NET instructions.
Glad this helped you! Indeed, there were some usage issues for me as well as a first time user of the .NET binding of SFML (installation and then some API inconsistencies with the native C++ version), but hopefully the SFML website will host its own set of tutorials and articles for SFML.NET soon, since this version too is pretty much part of the official library. 🙂
Thank you! This was so easy.
Just to note, use the x64 for 64 bit applications and the x86 for 32 bit. Make sure to specify which version your application is.
You’re welcome! Glad to help. 🙂
Also yes that is something to take note of, and is easily overlooked. I’ll be adding that to this post. Thanks!
I got a vague error about my path settings that might be wrong. But in the end all I had to chance was the ‘prefer 32 bit’ option. I did this with visual studio 2012.
Thanks for the tutorial. After several failed attempts, followed by several careful re-reads of your blog everything worked. 🙂
For anyone else reading this I also had to set my project platform target to 64-bit mode for it to work.
I had to remove the paranthesis on app.IsOpen() to make it work with visual studio community edition 2015, and i to set Platform target to x64 to make 64 bit work.